How to Use Crreo AI Video Maker
Navigating Your Video Creation Workflow
Before you begin, here’s a quick overview of how to move through the 5 steps of your video creation journey.
The Workflow
Step 1: Input Idea or Script
Step 2: Design Characters (Optional)
Step 3: Edit Storyboard
Step 4: Fine-Tune Timeline & Assets
Step 5: Preview, Download & Share
Each step guides you through a specific part of the creative process — from writing and visualizing to refining and publishing.
Now that you’re familiar with the workflow and navigation, it’s time to begin your creative journey.
Using the Stepper Navigation
You can move backward to review or edit any previous step.
You can move forward again up to the latest completed step.
Navigating along the stepper does not regenerate any assets — your existing content remains unchanged.
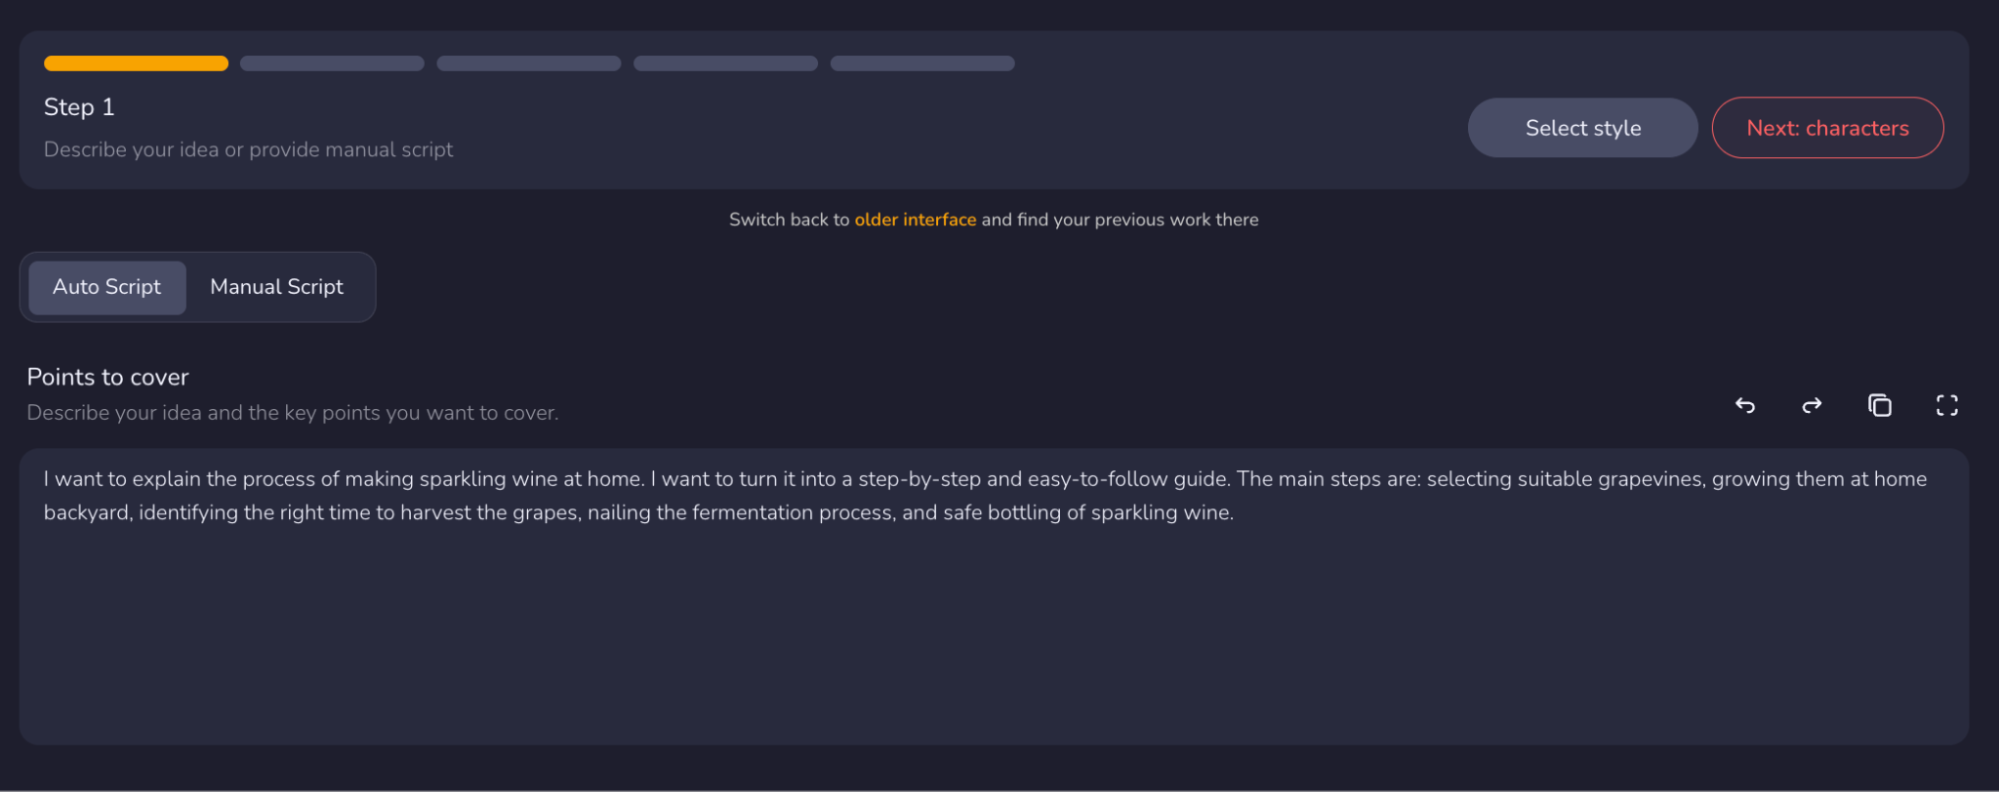
Step 1 — Describe Your Idea or provide manual script
In this step, you define what your video is about — it’s the foundation of your story.
You can either let AI create the script automatically or paste your own video script.
Choose Your Script Mode

You have two ways to start your video:
Option 1: Auto Script
Let Crreo handle the script for you.
- Click Auto Script — the system will create a full, ready-to-use video script for you.
- Enter a short description of your idea in the Points to cover box.
Example:
“I want to explain the process of making sparkling wine at home. I want to turn it into a step-by-step and easy-to-follow guide. The main steps are: selecting suitable grapevines, growing them at home backyard, identifying the right time to harvest the grapes, nailing the fermentation process, and safe bottling of sparkling wine.”
💡 Tip: A clear and focused idea helps the AI craft a more accurate and engaging script. Try to summarize your main message in one or two sentences — what story you want to tell, what the viewer should learn or feel, and any specific scenes or moments you imagine. The more direction you give, the more the AI can match your vision.
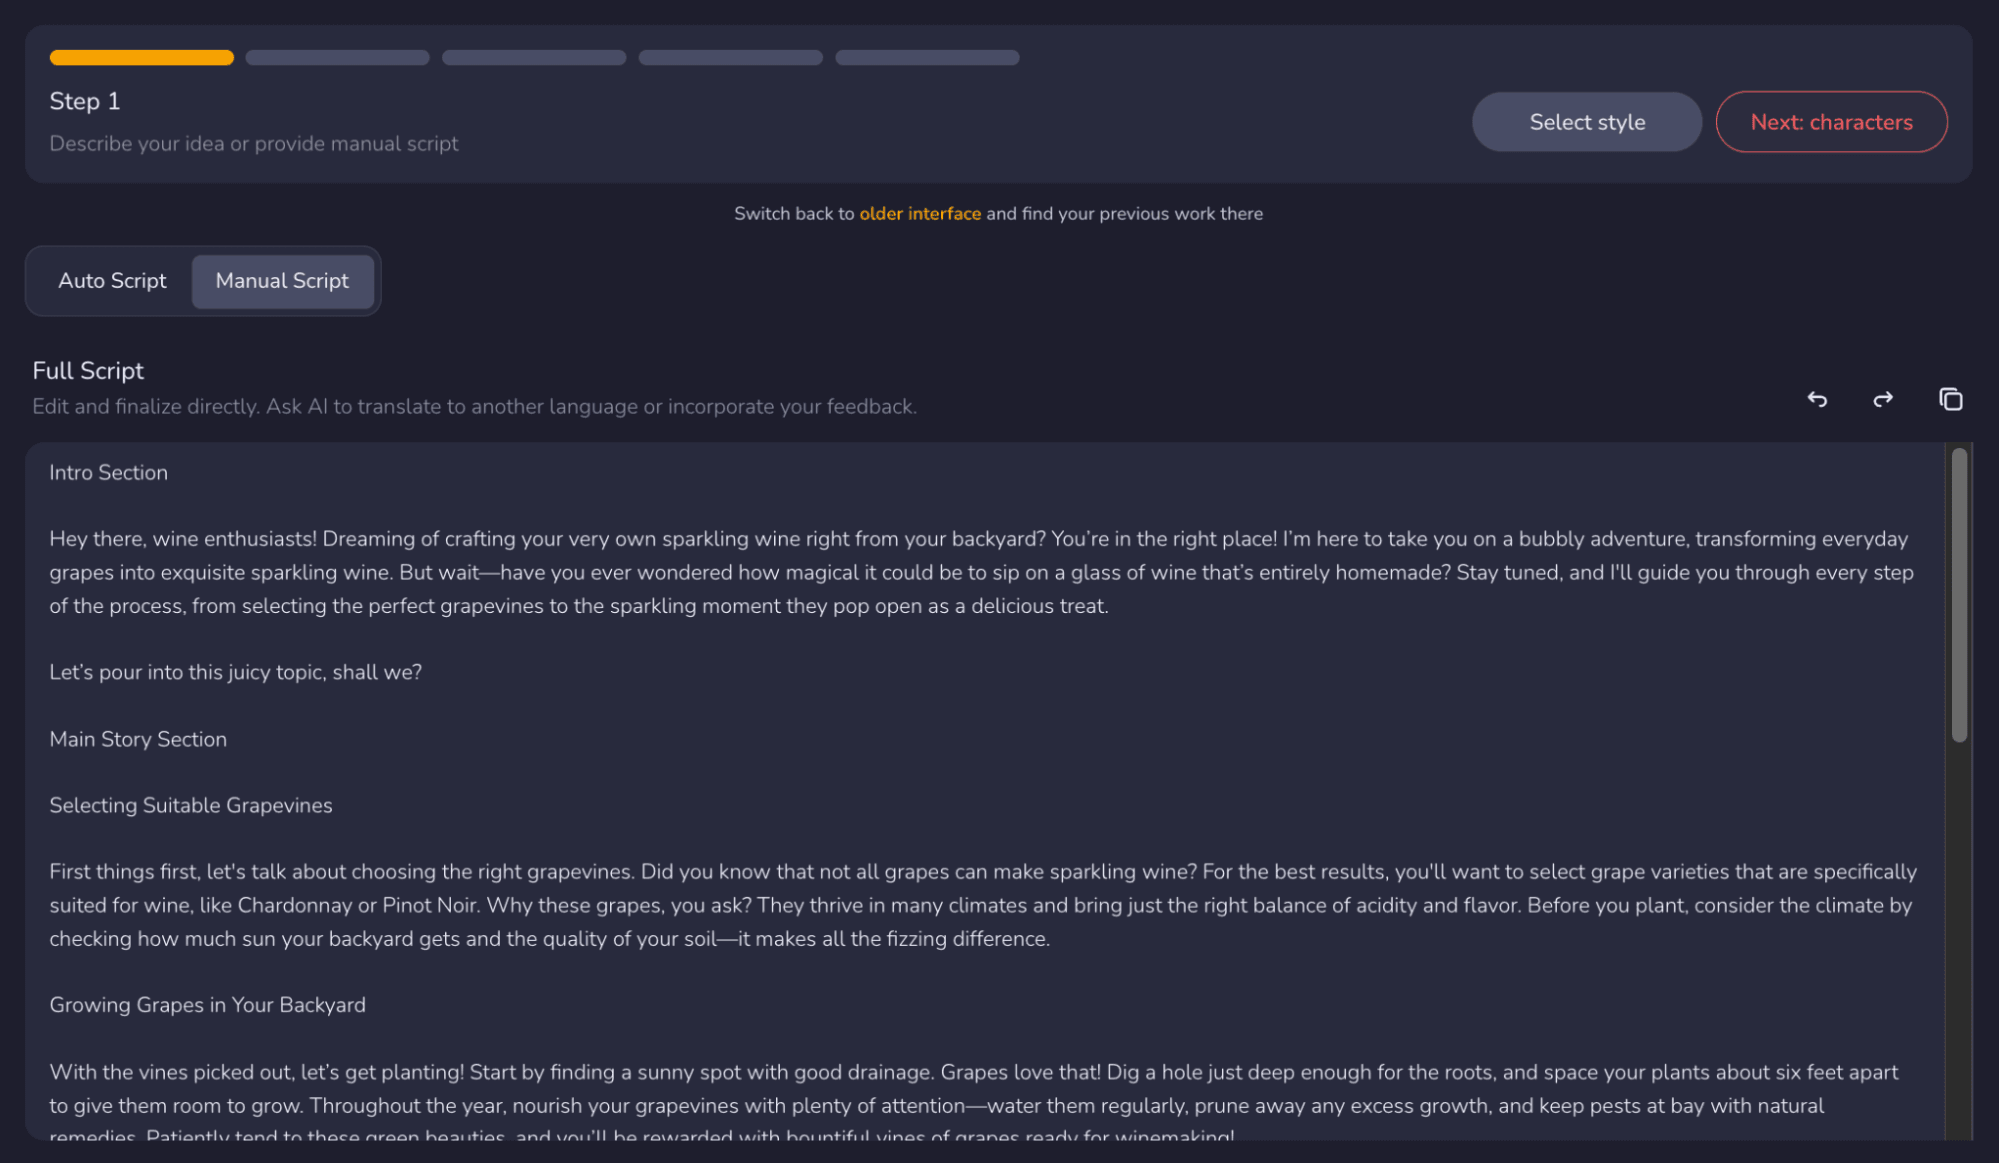
Option 2: Manual Script
Already have a script?
- Click Manual Script, then paste or type your content directly.
- You can break it into scenes, or simply provide the full narration.
💡 Tip: Manual Script gives you full control — perfect for professional creators or branded storytelling.
Manual Script vs. Auto Script: What’s the Difference?
Manual Script Mode
In Manual Script mode, the system uses your exact input — without expanding, rewriting, or shortening your text.
The video length in this mode fully depends on the length of your provided script. You can roughly estimate the duration by checking your word count:
For example:
- A script with 600 words will produce a video of approximately 4 minutes.
- To create a 10-minute video, you’ll need a script of around 1,500 words.
(On average, normal speech speed equals about 150 English words per minute.)
Auto Script Mode
In Auto Script mode, the AI automatically expands your input — whether it’s a short phrase or a paragraph — into a complete script.
The video duration is determined by the “Duration” setting in the Customize Menu.
For instance, if you select 15 minutes, the system will automatically generate a script of roughly that length, regardless of how short your initial input was.
Video Options Setup
Once you’ve entered your idea, click Select style to customize your video style.

Auto Script Settings
When using the Auto Script mode, these options determine how the AI creates your video script — including its content, tone, and language.
The following settings are only active in Auto Script mode and do not affect Manual Script.
1. Duration
Choose the total length of the video you want to generate. The AI will automatically adjust the script length to match your selection.
Available options: 1, 2, 3, 5, 10, or 15 minutes.
💡 Tip: For short-form content, 1–3 minutes is ideal. For tutorials, explainers, or storytelling videos, consider 10 minutes or more.
Different plans offer different maximum durations:
| Free | Start | Grow | Pro | Ultra | |
|---|---|---|---|---|---|
| Max video duration | 1 min | 5 mins | 15 mins | 15 mins |
2. Audience
Defines the target audience for your video, which affects the depth of information and the style of language used in the script.
- Novice: Designed for beginners audience, with simplified explanations of basic concepts.
- General: Default option for a broad audience.
- Expert: For a professional audience, using more technical and in-depth language.
3. Tone
Controls the mood and writing style of your script, helping you align it with your brand or platform.
- Casual: Natural and relaxed — perfect for social media.
- Formal: Professional and structured — ideal for corporate or educational content.
- Informal: Friendly and conversational — closer to spoken language.
- Creative: Expressive and narrative — best for ads or storytelling.
- Humorous: Playful and entertaining — great for lighthearted videos.
5. Change Language
If you want your script to be generated in a language other than English, simply type the desired language name.
Example: Enter “Spanish” to generate a Spanish-language script.
Audio Settings
These options control how your video sounds — the voice that narrates it and the background music that enhances it.
1. Default Voice
Select the voice that will narrate your video. Choose from 250 lifelike voices.
You can click Hear Sample to preview the voice before generating.
💡 Tip: A clear and calm voice works best for tutorials or product explainers, while a lively tone fits social videos and ads.
Available by plan:
| Free | Start | Grow | Pro | Ultra | |
|---|---|---|---|---|---|
| Available Voices | 9 | 250 | 250 | 280 | 280 |
2. Background Music
Add background music to make your video more engaging.
You can adjust the volume level of background music:
- Off
- Auto
- Quiet
- Medium
- Loud
Video Settings
These settings define how your video looks — its resolution, style, and generation mode.
1. Size
Choose your video’s aspect ratio and resolution.
- 1280×720(16:9) – Horizontal format, ideal for YouTube or presentations.
- 720×1280(9:16) – Vertical format, ideal for TikTok, Shorts, or Reels.
2. Style
Select the overall visual style of your video.
- No Style – The system automatically selects a suitable visual style for your video based on the content and theme.
- Custom Style – Enter any specific artistic style (e.g., “Ghibli style,” “Pixar 3D”).
- Photo-realistic – Highly realistic; great for product or people.
- Cinematic – Dramatic lighting and mood; stronger storytelling.
- Fantasy – Imaginative, fantastical visuals.
- Painting – Artistic/oil-paint feel.
- Drawing – Hand-drawn look; great for education/animation.
- Illustration – Clean graphic look; great for infographics/tutorials.
- Cartoon – Animated character style; playful or kid-friendly.
- Sketch – Black-and-white linework; concept or prototype feel.
3. Image Model
Choose the quality and detail level of generated visuals.
- Kalo S
- Kalo M
- Kalo L
- Kalo XL
💡 Tip: Use Kalo XL for final high-quality outputs; Kalo S for quick drafts.
| Free | Start | Grow | Pro | Ultra | |
|---|---|---|---|---|---|
| Access to Image AI models | Kalo S | up to Kalo M | up to Kalo L | up to Kalo XL |
4. Video Mode
Defines which rendering engine the system uses.
- Images – Generates still images only.
- Kine 1.1 / Kine 2.1 / Kine 2.2 – Different generations of the Kine video engine.
Kine 1.1 is an upgraded version of Kine 1, offering cleaner visuals, smoother motion, and more realistic physics.
Kine 2.1 is an enhanced version of Kine 2, excelling in precise understanding and high visual consistency — ideal for complex narrative videos.
Kine 2.2 builds on Kine 2.1 with faster generation speed, improved motion accuracy, and better handling of vertical compositions.
💡 Tip: For the best animation quality and overall visual performance, we recommend using Kine 2.1 or Kine 2.2.
| Free | Start | Grow | Pro | Unlimited | |
|---|---|---|---|---|---|
| Video AI model | Kine 1.1 | Kine 1.1 | Kine 2.2 | Kine 3.1 (1080p) | Kine 3.1 (1080p) |
5. Subtitles
Choose where subtitles appear.
- Bottom – Default; works for most videos.
- Top – Use when the bottom is visually busy.
- None – No subtitles.
6. Transition effects
Add smooth transitions between scenes for a more cohesive viewing experience.
- None — No transitions applied.
- Auto — System automatically selects suitable transitions based on your scenes.
- All Same — Applies one consistent transition style to all scenes.
Effect type:
Credit for transition effects visuals: Contributors to the FFmpeg Community Documentation Wiki
None
Fade
Slide
Wipe
Smooth
Circle
Horizontal
Diagonal
Dissolve-cut
Radial
Horizontal Blur
After completing your script and settings, click Add Characters to move on to character creation.

Step 2 — Add Characters
In this step, you can create or select characters that will appear in your video.
Characters help maintain visual consistency, narrative clarity, and storytelling depth across your scenes.
You can skip this step if your video doesn’t require specific characters.
Text-based Characters
Describe your character in text — including appearance, style, and personality — and the AI director will keep that character consistent throughout the story.
This option is available to all users and is perfect for quick character setup.
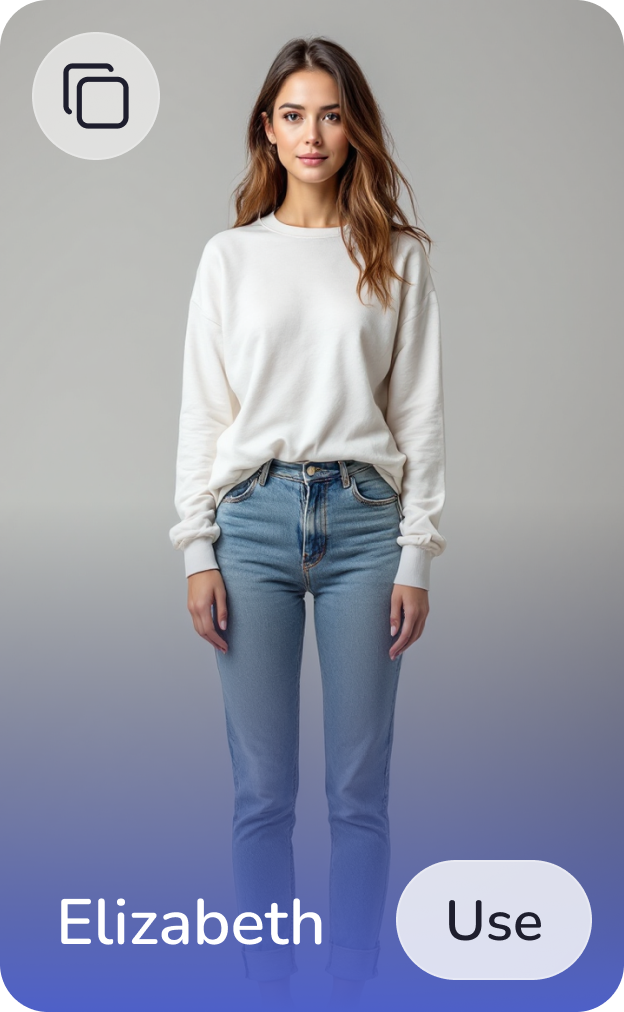
Photo-based Characters
Uses the actual character appearance to ensure stronger visual consistency across all scenes.
This feature is currently available to Grow plan and above.
How it works:
- Create from scratch – Describe what you need and generate a character from a prompt. Refine and adjust until it matches your vision.
- Upload your own image – Toggle to “Photo-based” mode (Pro plan only) to use a real image as your visual anchor. This gives you tighter control and noticeably better visual consistency across scenes.
- Choose from Crreo library – Select a ready-made character for instant use. Perfect for faster setup and rapid prototyping.
- Assign voices – In Dialogue Mode, assign voices to each character. In Narrative Mode, use your selected narrator voice from Step 1.
- Save to your library – Reuse your characters across projects for consistent storytelling and brand continuity.
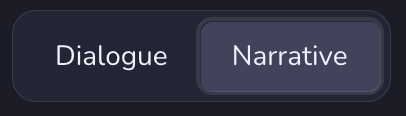
- Choose your story mode – Supports both Narrative and Dialogue modes, with up to 4 characters per video.
Dialogue Mode

Make your characters speak and interact with each other.
Each character speaks in first person and takes turns delivering their lines.
Perfect for conversations, debates, and emotional exchanges.
Narrative Mode

A single narrator tells the story while other characters appear visually.
Ideal for documentaries, explainers, and third-person storytelling.
After completing your character setup, click “Generate Storyboard.”
The AI Director will automatically generate a complete storyboard based on your script and character settings, maintaining visual and narrative consistency throughout.
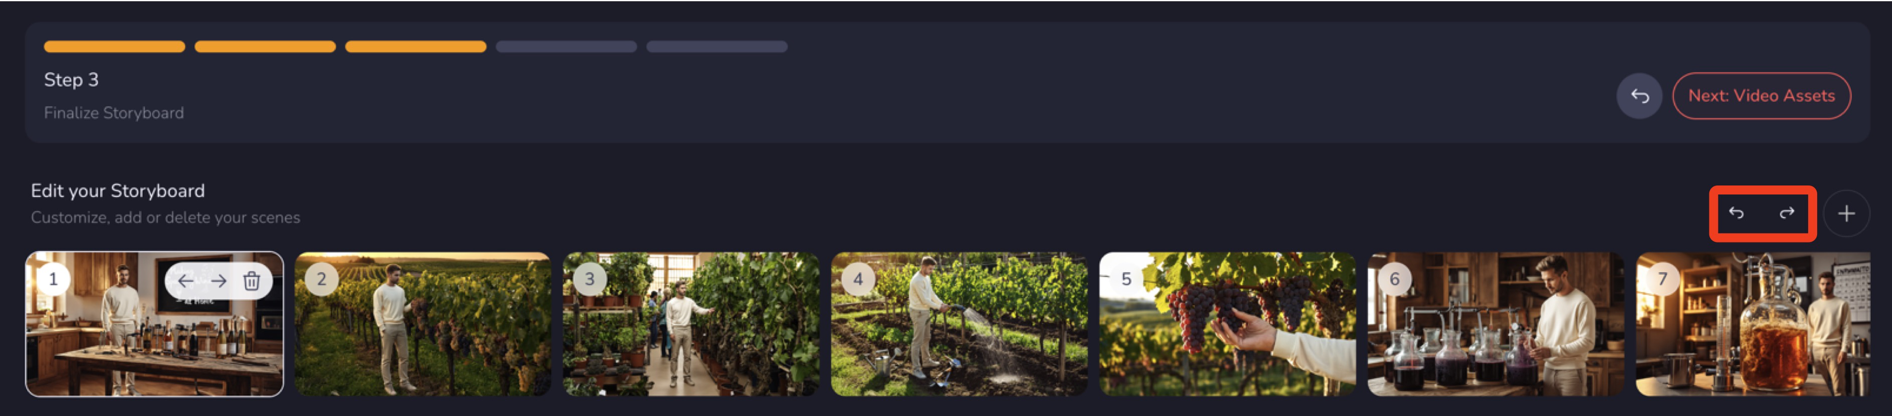
Step 3 — Finalize Storyboard
In this step, you’ll review and customize your storyboard — the visual and narrative structure of your video.
Edit Your Storyboard
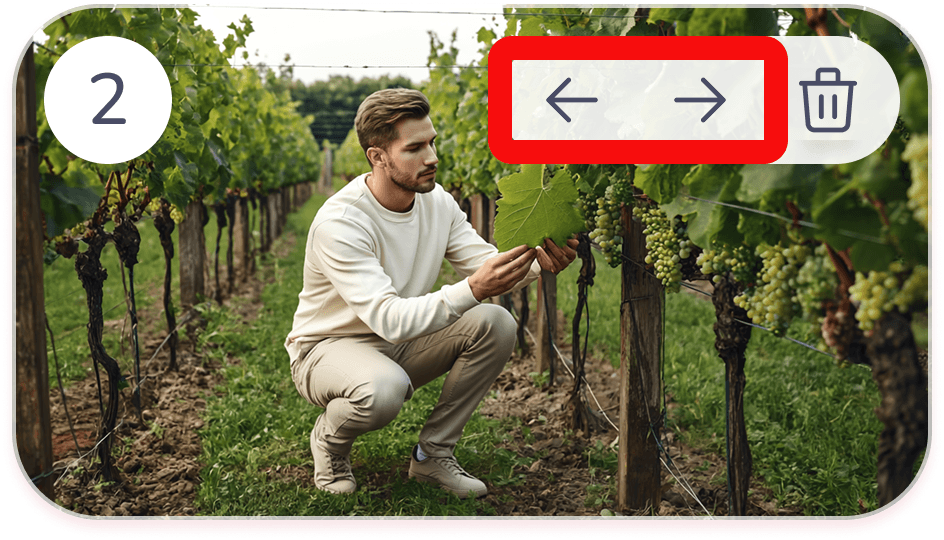
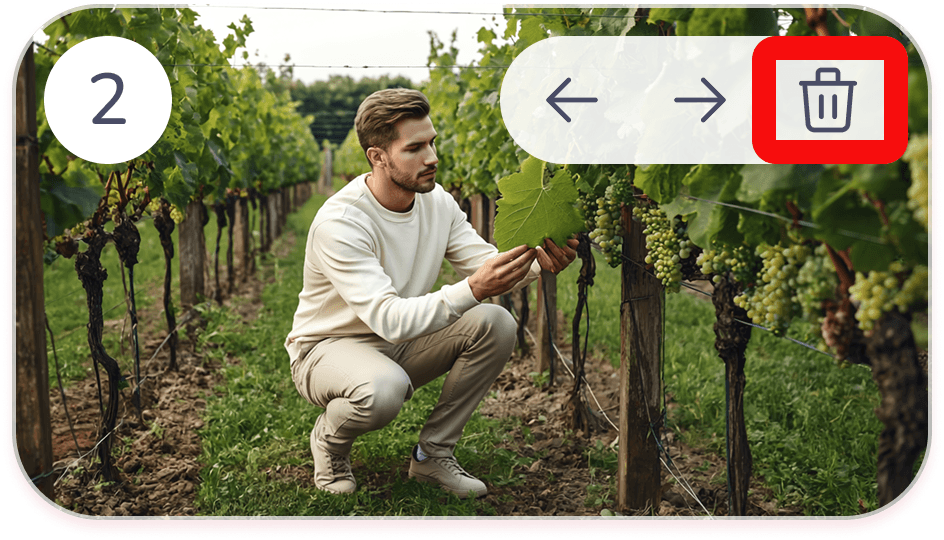
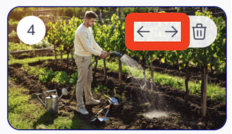
Here you can view, rearrange, or delete individual scenes.
You can:
- Reorder scenes — Use the left and right arrow buttons to adjust the order of your scenes.
- Delete scenes — Remove unnecessary ones.
- Add new scenes — Click the + icon to expand your story.
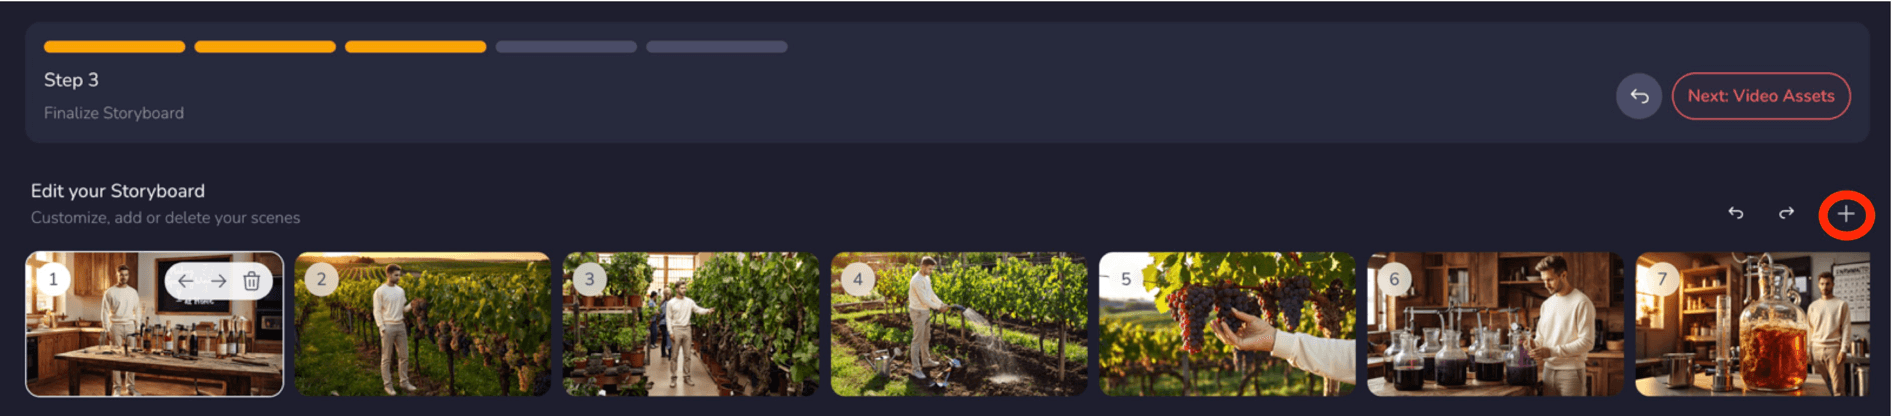
- Undo / Redo actions — Use the Undo / Redo buttons in the upper-right to revert or reapply recent edits.

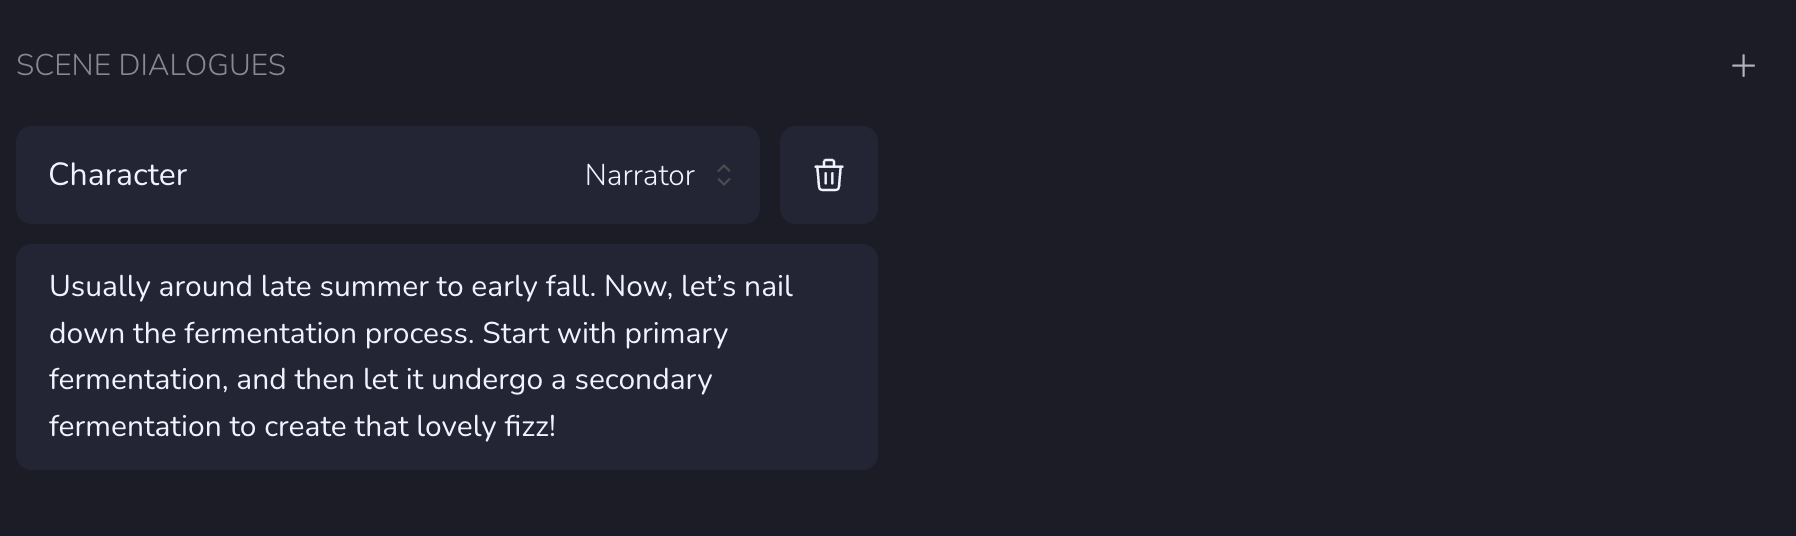
Scene Dialogues
In the Scene Dialogues panel, you can define who speaks and what they say.
Character – Choose or switch the speaking character.
Dialogue Text – Edit or rewrite dialogue lines to fit your tone or brand.
Add Character — Add multiple speakers for dialogue scenes.
Scene Visual
Here you can fully customize how each scene looks — including visual description, style, and model quality.
Style – Choose from Photo-realistic, Cinematic, Illustration, etc.
Model – Adjust generation quality (Kalo S / Kalo M / Kalo L / Kalo XL).
Scene Description – Edit the text describing the scene’s visual elements.
Scene Visual Toolbar
It is important to validate or update your scene visuals as they are used in the following steps to create scene visual assets. In the top-right corner of each generated image, you’ll find four icons (left to right):

- Download — Save the current image to your device.
- Upload — Upload your own custom image to replace the generated one (must be in a resolution matching your video — either 1280×720 for horizontal videos or 720×1280 for vertical videos).
- Edit Image — Refine or modify your images without starting over (Available on paid plans).
The Edit Image feature allows you to make targeted changes to a generated or uploaded image while keeping the overall look consistent. With precise control, you can:- Adjust any element in a scene (text, objects, background details, etc.)
- Match colors or mood to your preferred style
- Swap faces seamlessly
- Customize any part of the scene you can describe
- Regenerate — Create a new version of the image based on your updates.
Editing or Adding a New Scene
You can create a new scene or adjust an existing one in your storyboard.
To edit an existing scene:
Select it from Edit Your Storyboard and make changes directly in Scene Dialogues or Scene Visual.
To add a new scene:
Click the “+” button — a blank card will appear. You can then set up both Scene Dialogues and Scene Visual for this new shot.
① Scene Dialogues
- Add or select a Character, then write the Dialogue Text that fits the new visual.
- If the scene has no dialogue (e.g., a landscape or transition), you can leave this part blank.
② Scene Visual
- Write the Scene Description, e.g.:
“A warm celebratory scene where William enjoys sparkling wine with family and friends around a dining table. The camera captures the joyful atmosphere as everyone raises their glasses in a toast. Soft golden lighting fills the room, creating a festive and heartwarming moment.” - Adjust Style and Model as needed, then click 🔄 Regenerate to create the new image.
- Once multiple images are generated, preview the alternatives below and click Replace with Selected Image to confirm your final choice.
Preview Your Scene
If everything looks good, click Generate Assets to proceed to Step 4.
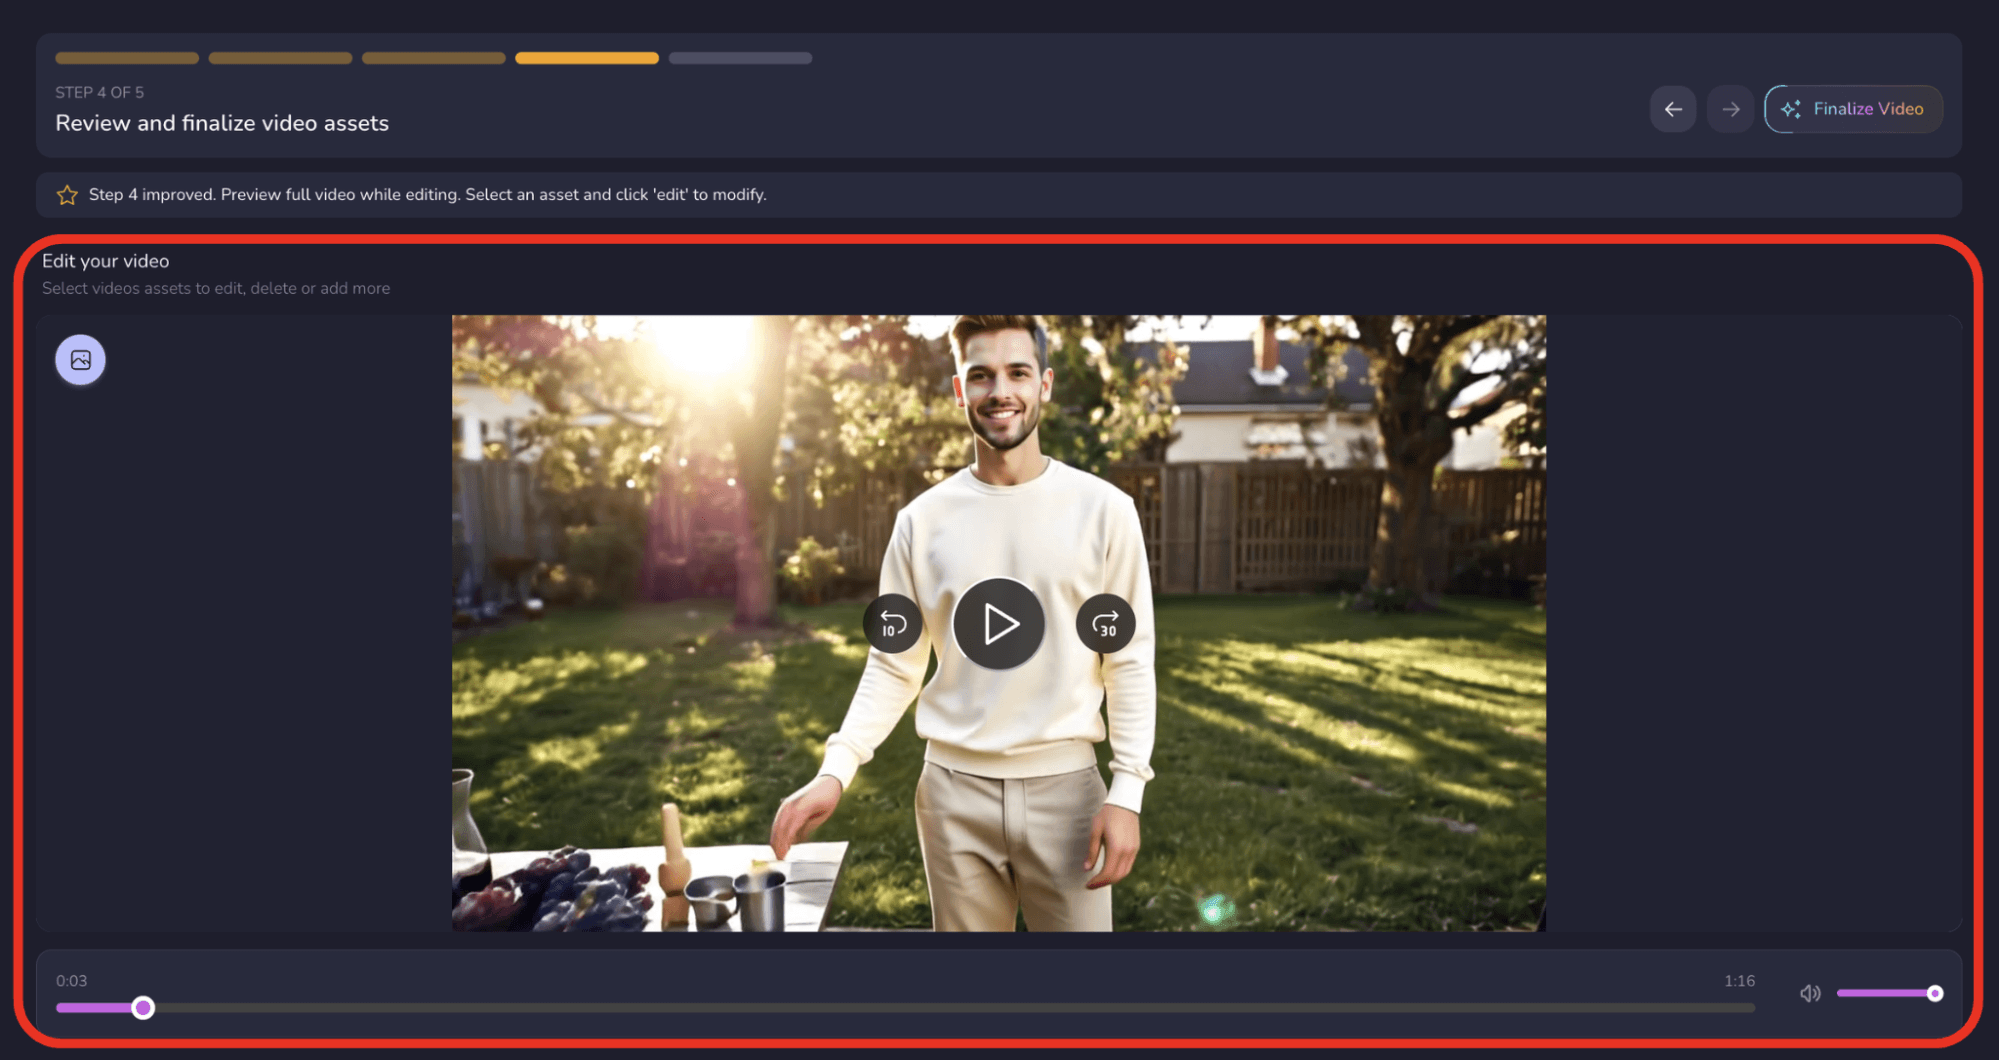
Step 4 — Review and finalize video assets
In this step, you’ll review, refine, and finalize all visual and audio elements of your video — adjusting motion clips, adding music, and preparing your final render.
Preview Your Full Video
In Step 4, the full video preview appears in the main workspace.
You can:
- Click Play to preview the entire video
- Drag the progress bar to scrub through specific moments
- Review pacing, transitions, and overall scene flow
You can continue editing your assets while the video is playing.

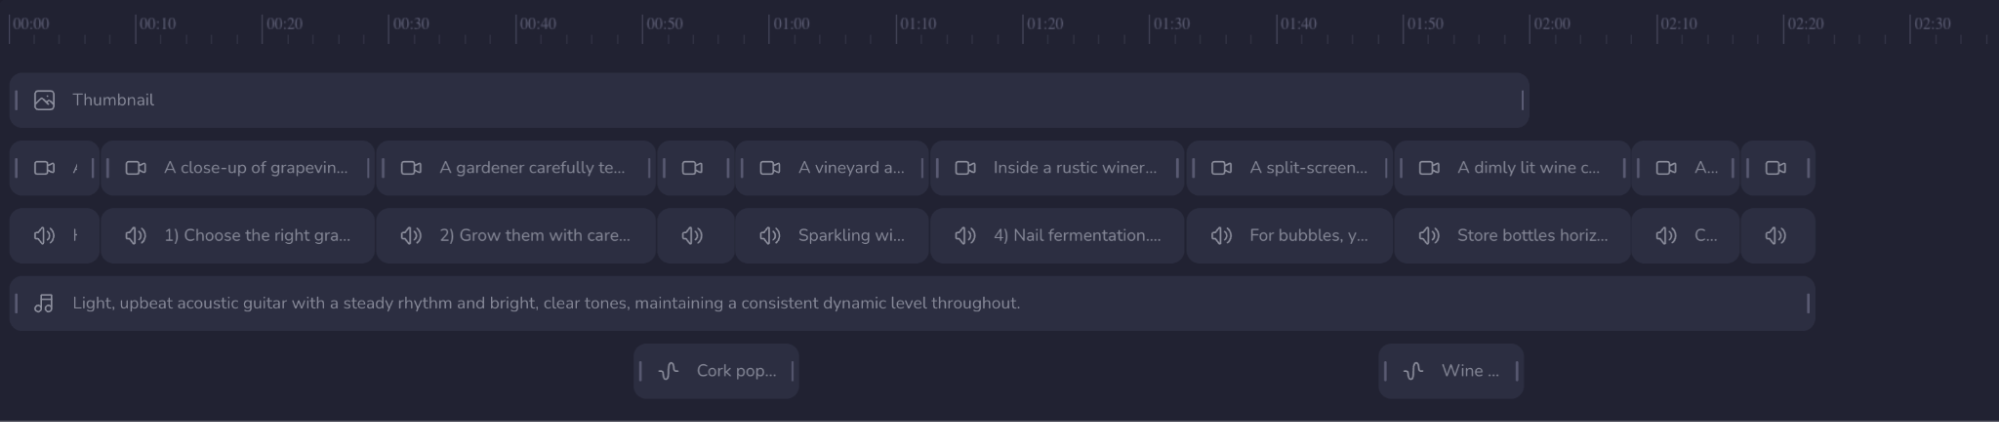
Timeline Editor
The timeline provides a clear overview of your entire video, allowing you to fine-tune visuals, voice, and music with precision.
Each color bar represents a different track:
- Visual assets
- Speech assets
- Music assets
- Sound Effects

Basic Controls
At the top of the timeline, you’ll find several quick-access icons (left to right):
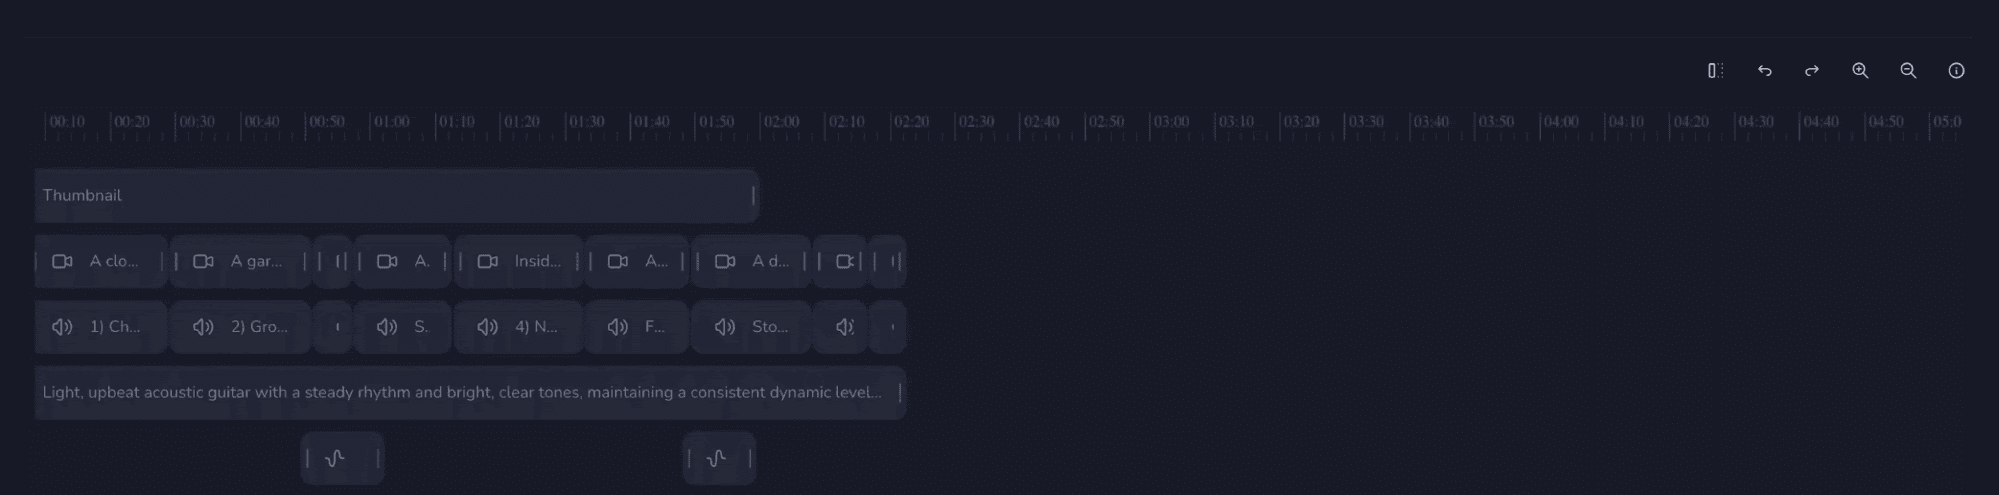
Add Element — Add a moving image, video clip, speech, background music, or sound effect to your scene.
Align — Pull the selected element to the left for precise alignment.
Undo / Redo — Revert or restore your last action.
Zoom In / Zoom Out — Adjust the visible scale of the timeline to see clips more clearly or fit longer videos in view.
Info — Display tooltips for editing functions.
- Scroll through video timeline left-right; zoom in/out as needed
- Click on any visual, speech, music and sound element to edit and regenerate
- Select and move elements left and right along the timeline
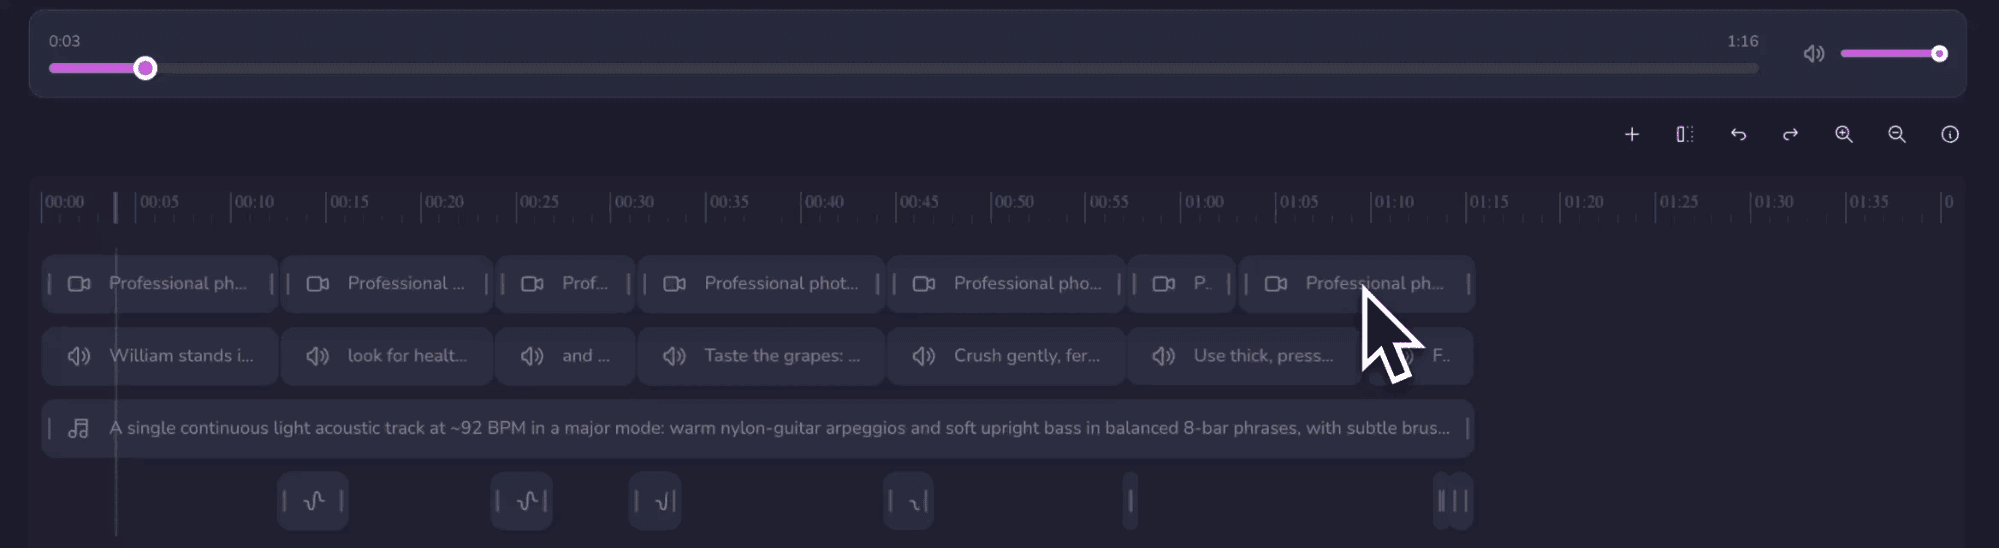
- Select and shorten or extend visuals, music and sounds
- Select and delete or add a new visual, speech, music or sound element
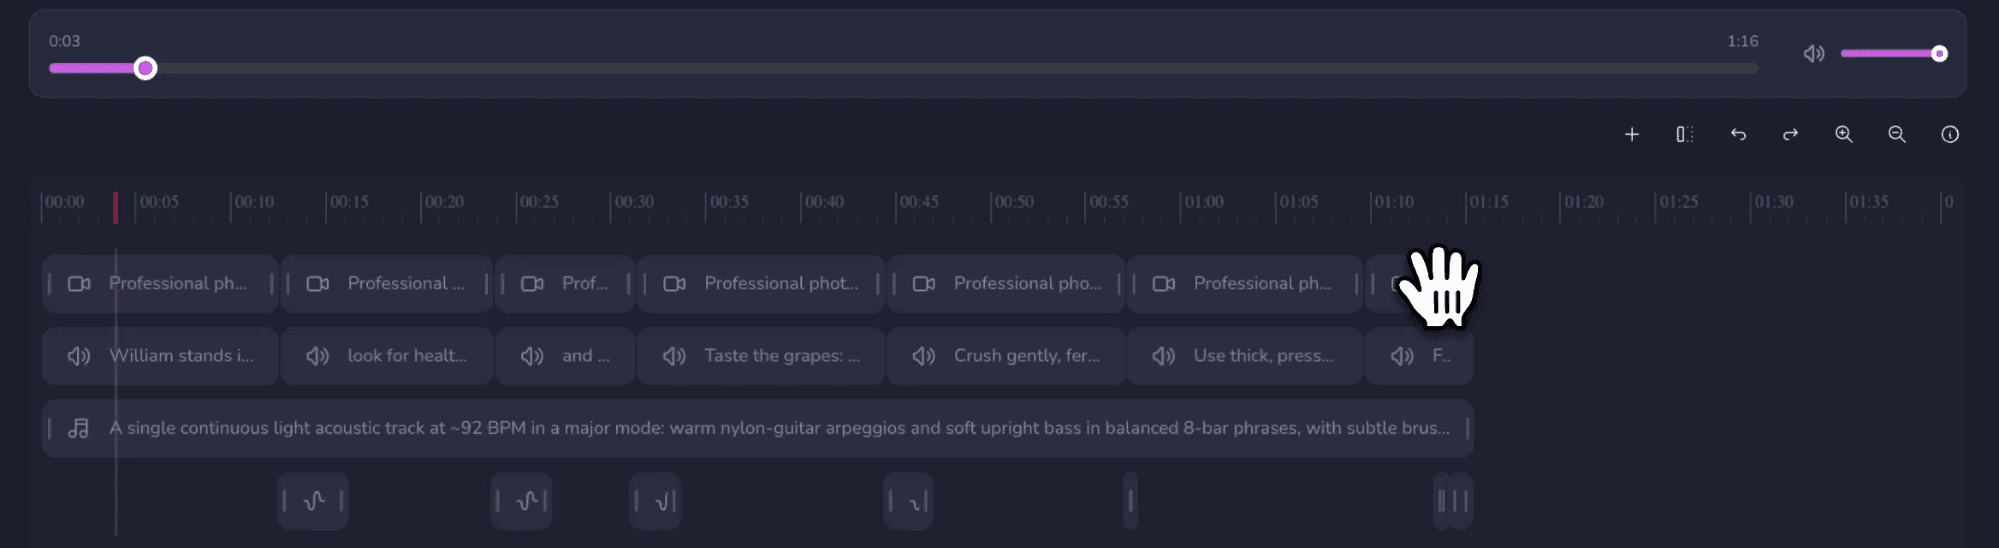
- Select and drag an element over neighbors to swap/change order
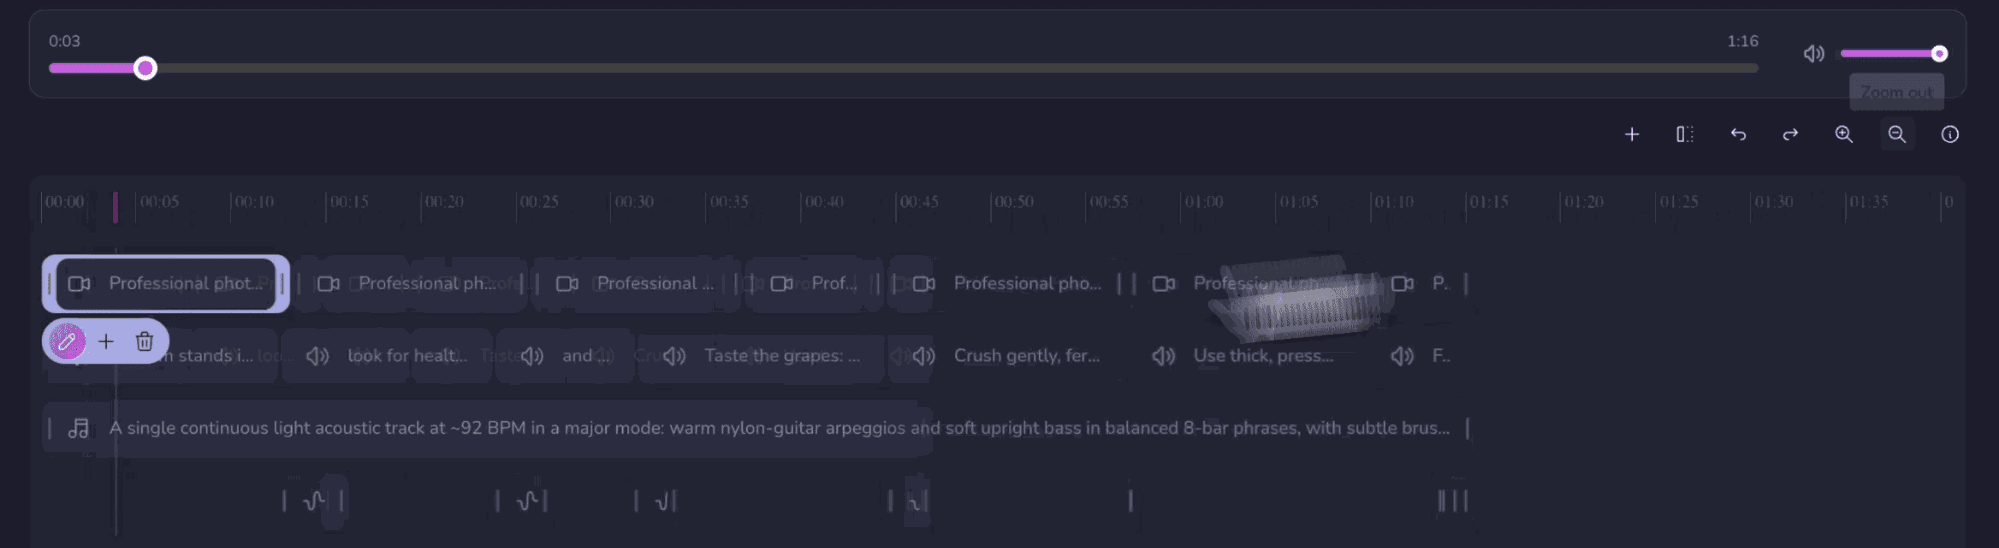
Quick Action Toolbox
When you select an element in the timeline, a pill toolbox appears for quick actions.
- Edit — Edit and modify the selected asset.
- Add after — Add new assets.
- Delete — Remove the selected clip.
Edit Asset
Each element in the timeline can be opened and edited individually.
Select any asset from the timeline and click Edit to open the Editing Panel on the right side of the screen, you can preview, rewrite, or regenerate visuals and audio anytime.
Video Thumbnail
A thumbnail has been automatically generated for your video.
To edit the thumbnail, click the thumbnail icon in the top-left corner of the video preview area.

If you’d like to modify the thumbnail, click  Edit Image, update the description with your preferred scene, style, or composition, and apply the changes.
If you’d prefer to generate a completely new version, click 🔄 Regenerate to create new options. Each regeneration provides three variations — select your favorite and confirm with Replace with Selected Image.
💡 Tip: Choose a bright, high-contrast thumbnail to grab attention on social platforms.
Video Visuals
Select the target scene and click Edit from the Visual track in your timeline to open its Editor panel.
Video Clip Scene Input Image
Under the Input image tab, you control the visual foundation of the scene.
You can:
- Adjust Style
- Select Model
- Edit or rewrite the text prompt — describe the desired composition, action, or emotion
- Download the current image
- Upload your own image
- Edit Image
Click the Edit image icon on the image preview to refine the current image without fully regenerating it.
- Regenerate Image
Click 🔄 Regenerate to create three new alternative scene options based on your current prompt, style, and selected model.
Video Clip Scene Output video
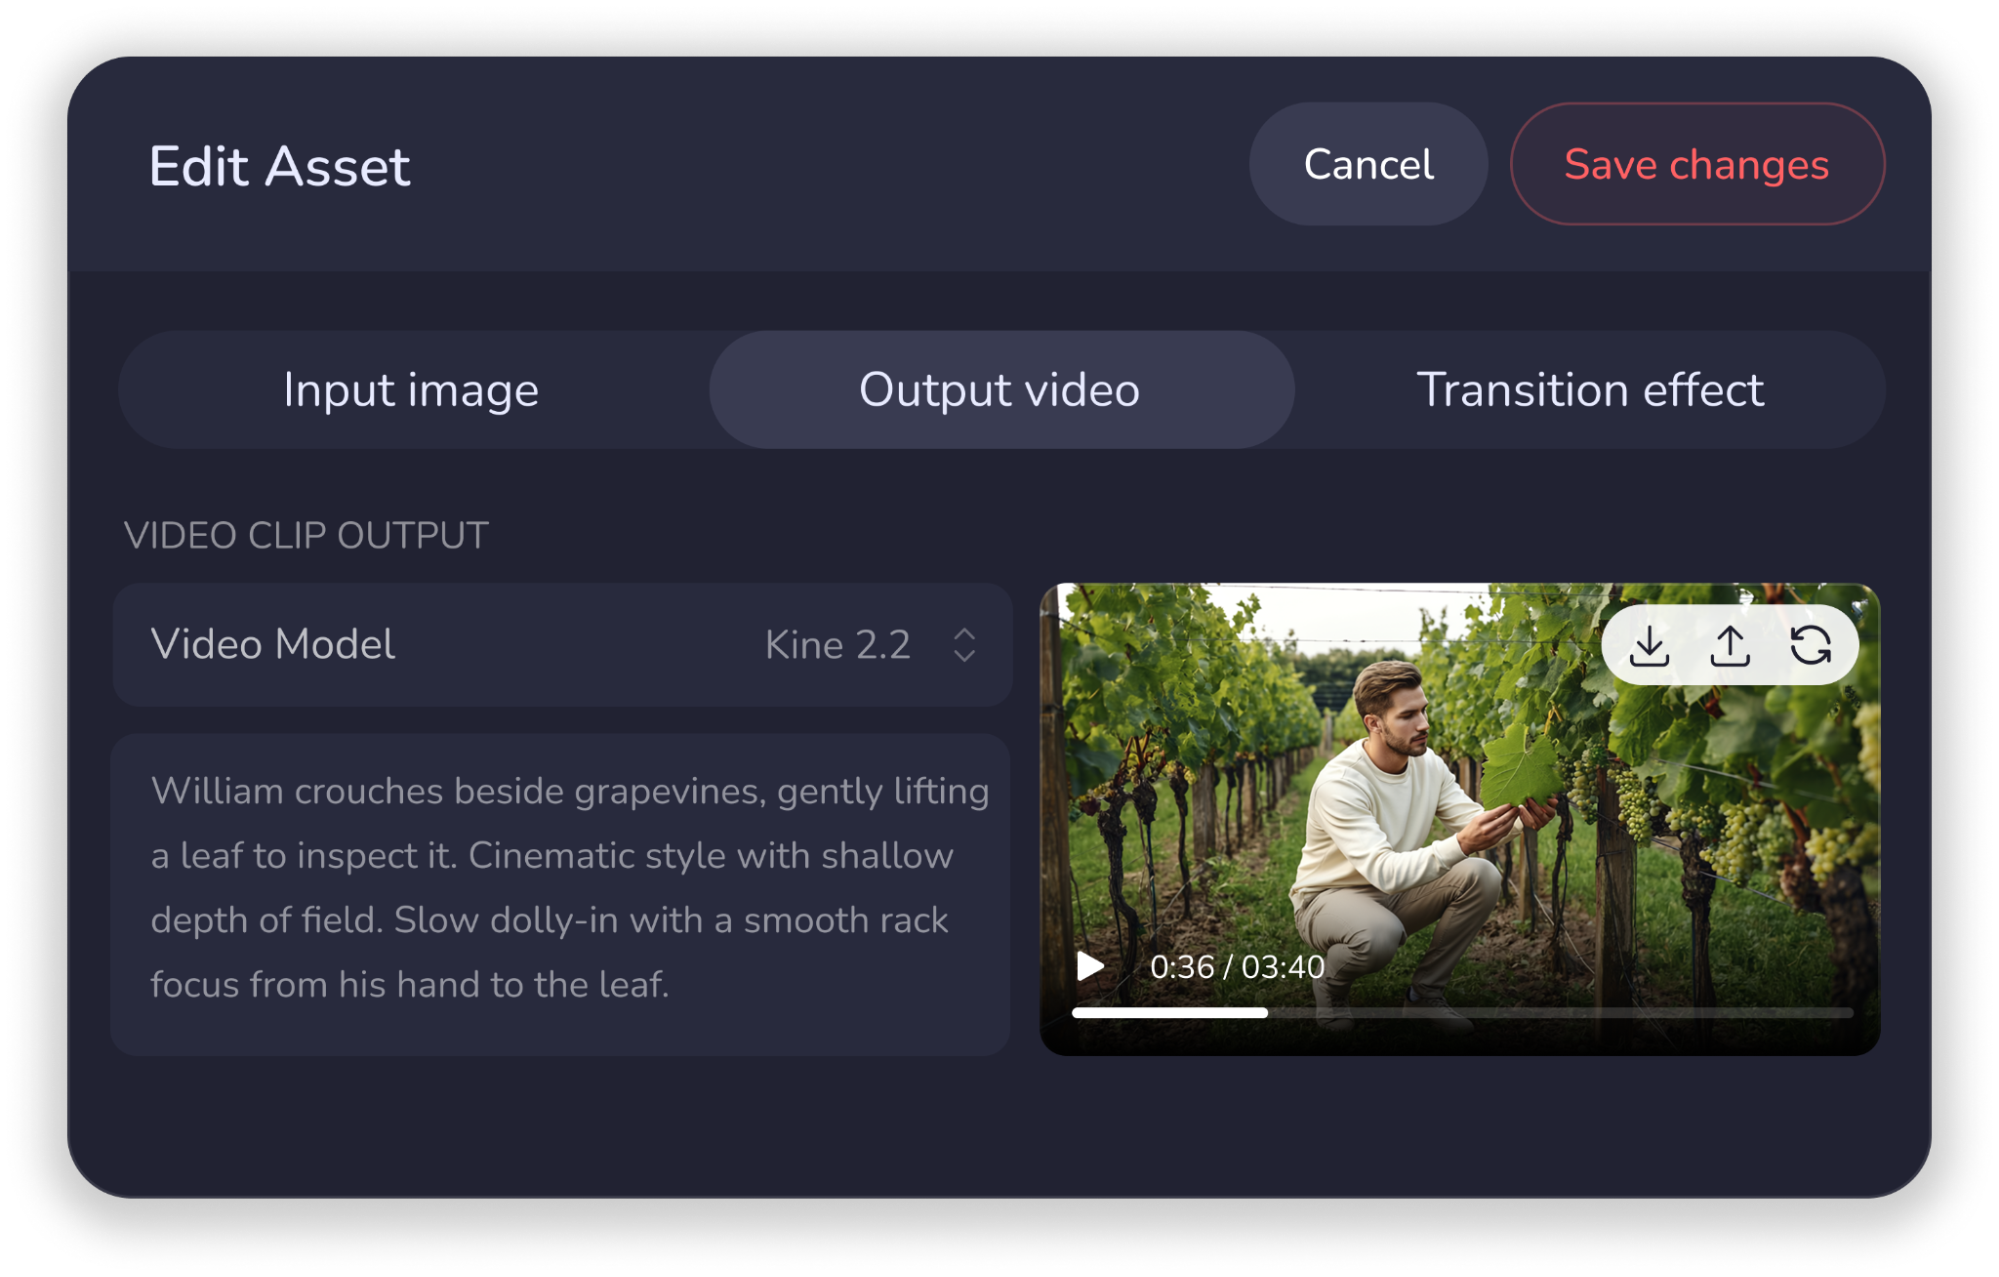
The right panel shows the final rendered motion clip generated from your input image.
- Preview — play the generated motion video to review animation quality and flow.
- Adjust video model and video description
- Regenerate — recreate the scene animation based on the same image or updated settings.
- Upload Video — replace the generated clip with your own custom footage.
- Download — export and save the video clip.
Transition Effect
Open the Transition effect tab in the Editing Pane to control how the selected scene connects to the next one.
Here you can customize:
Effect type — Choose the transition style (for example, Fade to White).
Duration — Adjust how long the transition lasts using the slider.
Scene Speech
In the Speech section, you can edit the script and control the generated voiceover for this scene.
Edit the Script — Update the text directly in the script box to modify what the voice will say.
Select a Voice — Use the Voice dropdown to choose the desired voice.
Click the ▶ button next to the voice selector to preview it.
Regenerate Audio — Click the 🔄 icon to regenerate the speech audio based on your updated text and selected voice.
This generates a new voiceover clip that reflects your current script and voice settings.
Scene Background Music / Scene Sound Effects
In the background music and sound effects section, you can edit or regenerate the background audio for this scene.
Edit the Description:
Enter or modify the text prompt to describe the music or sound effect you want.
Regenerate Audio:
Click the 🔄 icon to generate a new audio track based on your updated description.
Preview:
Use the audio player to listen to the generated track.
Click Save to apply the selected audio to your scene.
Additional Audio Controls
The audio bar provides the same set of controls for all scene audio, including Speech, Scene Background Music, and Scene Sound Effects.
You can:
- Play and preview the current audio
- Download the audio file
- Upload your own custom audio
- Regenerate the audio clip
Finalize Video
Once you’ve reviewed all visuals, timing, and audio tracks, click Finalize Video to render your final version.
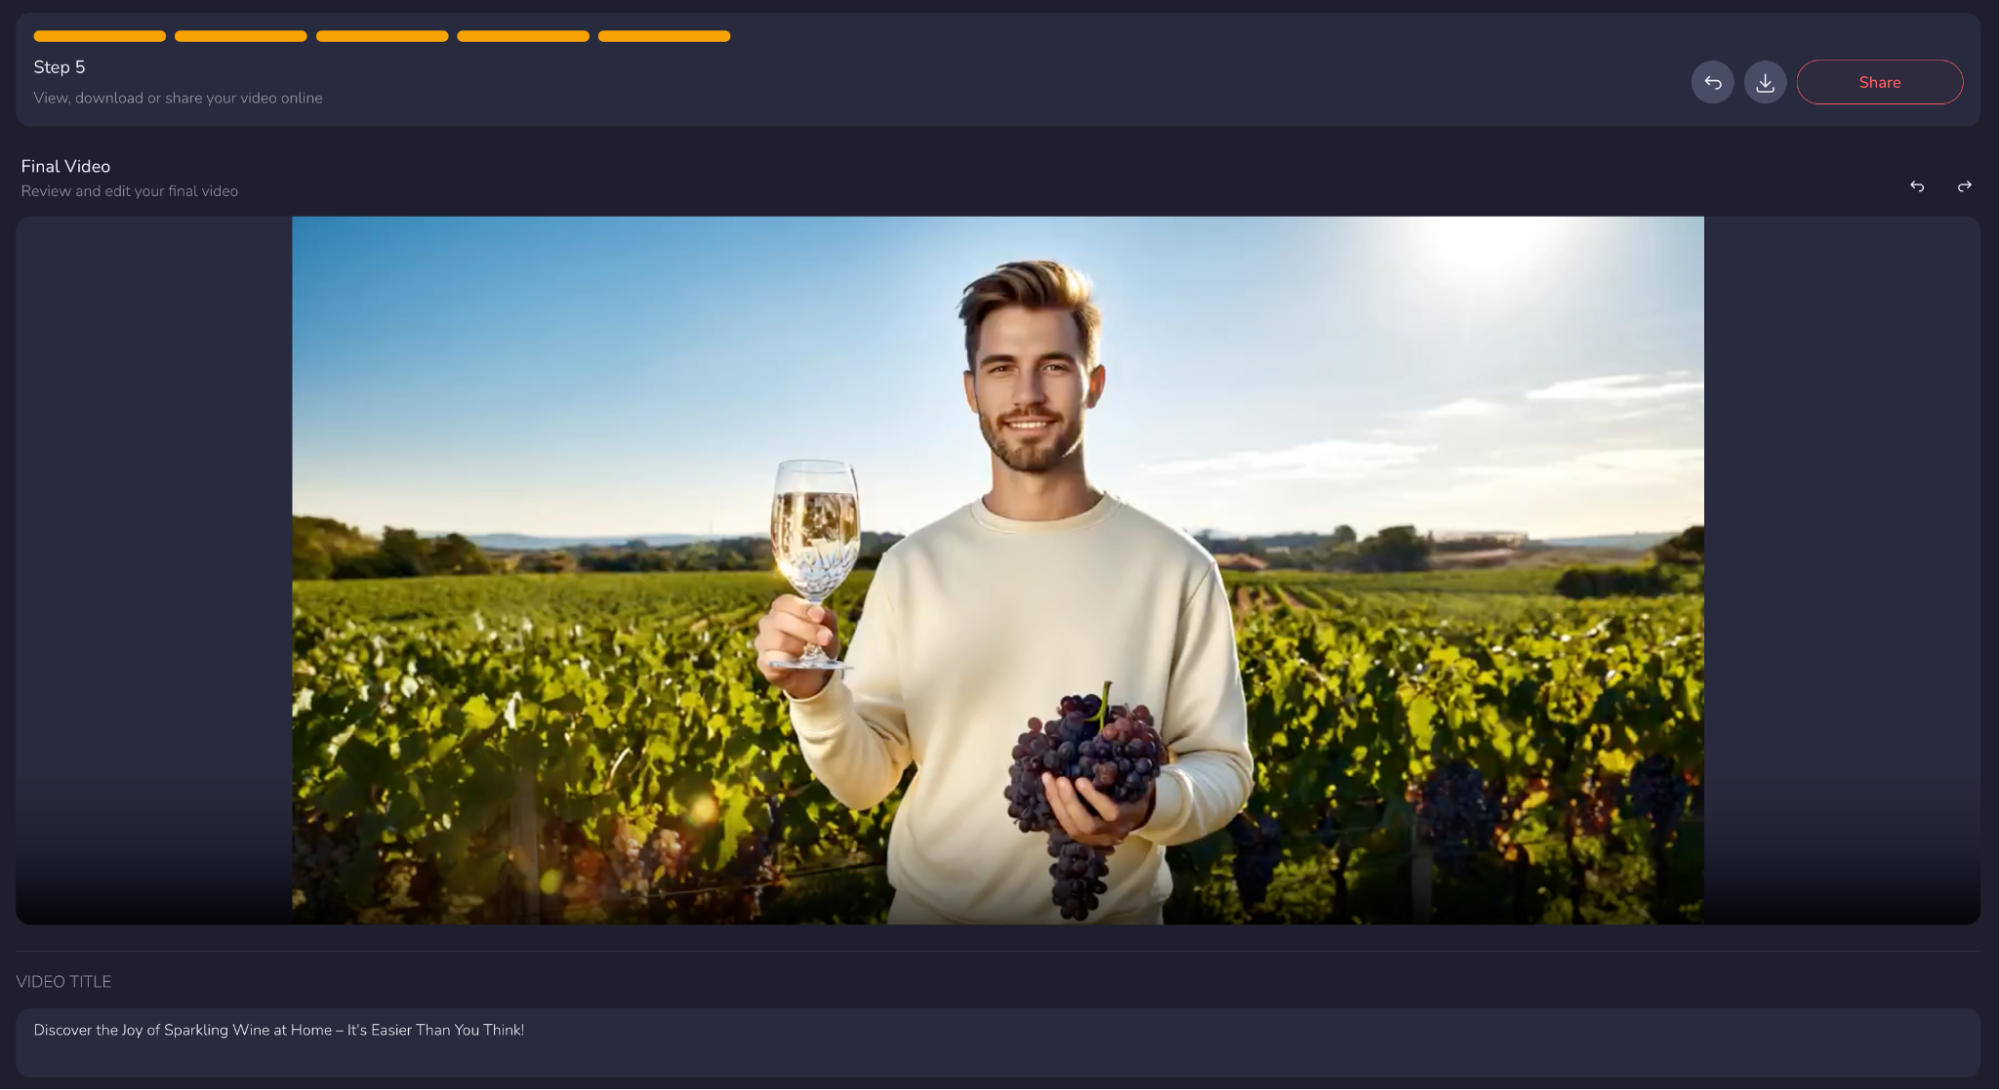
Step 5 — View, download or share your video online
In this final step, you can preview, download, or share your completed video.

Final Video Preview
Watch your full video to ensure every scene, transition, and audio element looks exactly as you want.
If you notice anything that needs changes, click the ↩ Back button to return to Step 4 and make edits.

Download & Share Options
Download — Save your video locally in MP4 format for offline use.

Share — Instantly generate a shareable link to distribute your video online.

Video Title
The video title is generated based on your content and theme.
It’s designed to be compelling and optimized for engagement and conversions.
You can review it here before copying to ensure it fits your project tone.

Regeneration Rules by Step
Modify Step 1 Settings
- If you would like to modify settings in Step 1 in a project that already has assets created, currently only changes to Background Music and Subtitles are applied immediately. Any other changes made in Step 1 require regenerating Step 3 for the updates to take effect.
(Support for the immediate application of additional settings in Step 1 is planned for future releases.)
Regenerate Storyboard
If you would like to modify characters or regenerate the entire storyboard, return to Step 2 and click “Regenerate Storyboard” to update the storyboard in Step 3.
Regenerate Assets
If you would like to regenerate all assets in Step 4, return to Step 3 and click “Regenerate Assets.”

You’re All Set!
Congratulations — you’ve completed all five steps!